Red herrings en route to the Mercuridome.
Greetings dearhearts.
I am on a mission!
Back in the days of yore, before we discovered the full extent of the Termite Inheritance, I fell in love with these doors and wanted them for the dressing room.
It was in that faraway time when when we were bathed by a sort of pre-lapsarian innocence, believing that the budget would provide for everything. It was before we realised just how bad the house was and how much of our money would go on re-building walls and floors and joists. You know, those things they tell you are necessary. Though me, I’m not so sure. Floors, I say? Surely all we need are wings, willpower and the merest dab of mousselline.
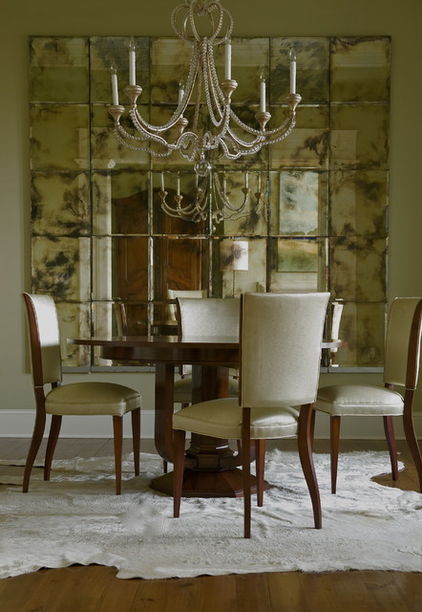
Since that heady time, my various houseyhousey passions have wandered their usual fickle paths, but to the mirror doors they have remained true. So unusual is this, I must tell you, that I have been considering a proposal of marriage, or at the very least a long term arrangement. But even back then when the world was golden, an investigation into the cost of antiqued mirror revealed a price that would have sagged the sails of even the most intrepid retail voyageur. It was quite bezonkers. However, being of a ‘can do’ mentality (at least sometimes), I began, undeterred, to collect the hows and the whyfores to do it myself.
And it has taken me –ooo— the best part of a year to gather together all the gubbins needed for the alchemical transformation of new mirror into ‘old’. I tell you, it’s tough out there in the non-digital world! Mental, physical and temporal co-ordination don’t come easily. Nothing like the instant gratification to be had at the end of a cursor!
But anyway, eventually I got my arse into (low) gear when we were at the farm and I was ill but not prostrate, and in need of a project. So what follows is not a tutorial exactly, but a scruffy and ramshackle account of how to (and how not to) Do It.
Firstly, gather thy apparatus. To wit, one pair of red and white polka dotted rubber gloves (colour and dots optional), one spray bottle, one bottle of hydrochloric acid, one tin of paint remover, sundry mirror tiles, and the requisite dollops of time and mental space. Oh, and a mask suitable for inhibiting fumes. I hang my head hung in shame and admit that I omitted this item. Or rather, that I tried using a face mask suitable for dust because it was to hand, found it (quelle surprise!) of no use and thereafter held my breath while doing fumey things. This is why this is not a tutorial.

Proper blogs would have a picture of the equipment. I was in too much of a hurry. Here is a picture of the back of the mirror tile instead.
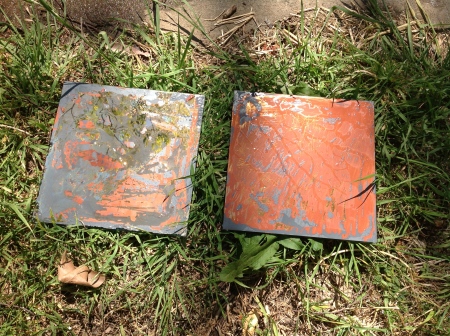
Secondly, don thy rubber gloves, take thy mirror tile, and consider its reverse side which will probably be coated with a grey plastic layer. Smear said plastic liberally with paint stripper. And I do mean liberally. At this juncture it’s advisable to go away and have a cup of tea, read a book, chase some cows or get on with another project. Because along the same lines as watched kettles, mirror tiles are shy when undressing. As for how long to drink your tea or read your book – this is a delicate equation that I didn’t manage entirely to crack. Overnight was too long for my tiles – they came with a copper layer under the plastic layer which I found it best not to dislodge, bearing in mind I wanted a more subtle end result. On the other hand, a quick cuppa and cursory flick through a mag was too short. Let’s say – oh – two hours then.
Thirdly, take thy rubber scraper and dislodge the by-now softened plastic layer. Go about this Gently Bentleyish. Channel the spirit of a gentle breeze just caressing the tops of waves. Do not even think of Bob the Builder. It is less important to remove all of the plastic than it is to not scratch the copper or reflective surface underneath. Because, forsooth, those scratches will be visible on the final product.

Left hand tile demonstrating the hung-ho method, with most of its copper backing removed. Right hand tile demonstrating restraint.
Fourthly, wash thy mirror gently, and dry. Treat it as you would a baby’s bottom, but without the talc. Then take thy spray bottle and make a 50/50 mixture of hydrochloric acid and water. These measurements are entirely haphazard, by the way; plucked from the ether. Take a roller tray, or similar somesuch, fill it with water and have it close by.
Fifthly, identify thy aesthetic and consult it whenever in danger of gung-ho-ness with the spray bottle. If you want a full-on look, give your tile a full-on spray. If, like me, you prefer a gentle foxing, go at it as would a good butler, with restrained hand and circumspect manner. Observe intently for any slight changes in the mirror backing – this may take less than a minute – and immediately submerge in your tray of goodly water. Those minute changes will grow and enlarge and may, if you are not quick enough, become a mutant mess that gobbles away all your backing until all you have left is plain glass. It is easier to re-spray than it is to start again. Naturally, this stage whizzed by so fast there was no time for photos.
Sixthly, decide on thy backing colour. This will be cover thy bare glass patches. Some people slather the backs of their mirrors in black paint. Some favour a melange of brassy, silver and other tones. Me, I tried silver and found it too pale. In the absence of a handy spray can of darker silver in the shed I tried grey. And what I will say unto you is Nah. Not quite.
And this is the end result.
Not as I would have wished, but passable. A little uncouth for my liking. A little short of finesse. I did several experiments, rearranging the parameters each time and what I concluded was that the process is easy to do but hard to control. The hardest thing of all was taking photos of mirror without making a cameo appearance in it myself. Even so, I can imagine making something like this:
But wait! It doesn’t end there.
Because it seemed to me that no matter how proficient I became, the end result was never going to have a certain quality of softness that I was lusting after in the original picture. So. Cue more internet trawling, and what I discover I actually need is mercury glass. The wherewithal for effecting such being readily available.
So, as they are so fond of saying, watch this space…


October 20, 2012 at 9:19 am
I adore following your adventures in renovating an old house.
I am in the middle of a renovation of an 1860’s terrace in Darlinghurst – I call it the money pit!
Do write more posts please!
October 20, 2012 at 9:42 am
Hello Victoria and welcome! Thanks for leaving a comment. Congratulations (on having a house in lovely Darlingithurts) and commiserations (on being halfway through the renovation process). Maybe we should form a club – for the impoverished and dust-caked.
October 20, 2012 at 4:37 pm
Love it – keep this inspirational flow happening – spare some time between the mirror glass for words and pics please
October 21, 2012 at 6:48 pm
Wilco Cap’n Birdseye.
October 21, 2012 at 12:28 am
I liked your mirrors! Keep practicing, I do feel you could find some good antiqued mirrored pieces in Indonesia, or somewhere closer and have it shipped to you. Its all over High Point (the biggest furniture market in the world) down the road from me and it is not expensive. I hear from people in Australia fairly regularly. Furniture is much more expensive there despite the fact that you are closer to the source.
October 21, 2012 at 6:45 pm
You liked my mirrors?! You’re a kind woman Liz. I’ll probably return to them after I’ve had a go with mercury glass.
And dont let me get started on how expensive Uh Straya is. It’s horrendous! Not only for furniture but white goods, kitchen and bathroom fittings – you name it. It’s relatively cheap if you like to fill your face a lot though…
October 21, 2012 at 10:51 pm
I meant to say that your suggestion about sourcing in Indonesia is a good one. So far I’ve got a few things shipped out from the UK – even with postage it’s cheaper. I bought Ms Pimp’s bath in from Bali as a sort of test case. If that goes well Ill think about more…
October 21, 2012 at 2:52 am
I am, as always, absolutely delighted with your storytelling, not to mention the huge task of making old from a new and all this… wonderful task , but be careful of mercury, when you find it, as I am sure you will. Lovely to read you . Waiting for more.. L
________________________________
October 21, 2012 at 6:38 pm
Hello you. It’s only pretend mercury glass so there’ll be no nasties (except the mess I’ll make while doing it). I tried to leave comments on your blog a while back to say how lovely your home town is, but for some reason they didn’t work. I shall have to try again – been meaning to ever since x
October 21, 2012 at 8:44 pm
I think I have this same photo saved in a file somewhere (a real file made of card, not a digital one). Is it World of interiors? beautiful aint it, and my I am so impressed that you are re-creating this your-self. What a determined and resourceful woman you are. I want to rush out and buy strong chemicals myself too now. But I probably won’t.
October 21, 2012 at 10:26 pm
Great minds, Rosa. And I think you’re right – World of Interiors. Maybe mercury glass would be more up your street. Fewer chemicals. Ill keep you posted.
October 30, 2012 at 5:39 am
Well I definitely liked studying it. This subject
provided by you is very constructive for good planning.